Every Bazel project begins with one little command:
bazel build //...If you've used Bazel before, you know that's the command that tells Bazel to build everything in the workspace. It's convenient, and it works: depending on how many targets you're building (and how well you're caching them), you may be able to get by with that one command for a good while.
But at a certain scale, building the whole Bazel workspace may no longer make sense. It may be when your builds become so complex that they exhaust all available resources, and things start to slow down—or just fall over. Or it may be when you decide to build more efficiency into your process, building only the targets that need to be built from one commit to the next.
Bazel itself offers a ton of flexibility for running highly-focused, selective builds, from precise target patterns to powerful tools like bazel query. But to do selective builds well, you'll often need more than Bazel alone—you'll need deep flexibility at the CI layer as well. Building an adaptable pipeline that can take full advantage of Bazel at scale is a tough problem to solve—and it's even tougher when the underlying platform only allows you to define the behavior of that pipeline statically, and up front, with YAML and Bash.
In this hands-on post, you'll see how with Bazel and Buildkite, you can tackle these scaling challenges differently. Specifically, you'll learn how to:
- Combine Git with
bazel queryto identify which Bazel targets were changed in a given commit - Use Python to define a fully dynamic, adaptable pipeline that builds only the Bazel packages that need to be built, adding additional steps to the pipeline at runtime as needed
- Capture the details of each Bazel build, transforming Bazel's raw build events into rich annotations that improve visibility and tighten feedback loops
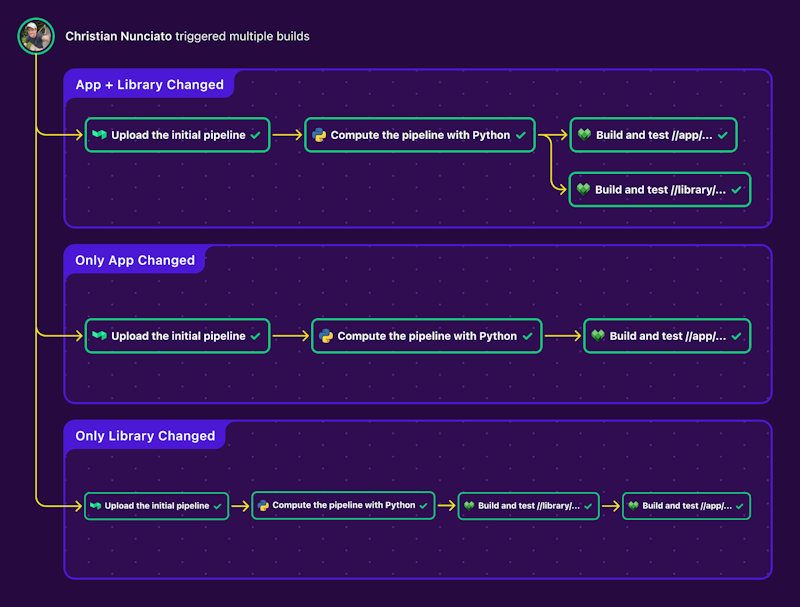
Composing the delivery pipeline at runtime with Python, Git, and the Bazel dependency graph
We've got a lot to cover—so get ready to download some tools, edit some code, and run some commands that'll have you driving your pipelines with Bazel in no time.
Let's get started.
Installing prerequisites
If you plan to work through this example (and I hope you will!), you'll need to set up a few things first:
- Bazel: We recommend installing Bazel with Bazelisk. If you're on a Mac and have Homebrew installed, you can do that by running
brew install bazelisk. If not, follow the instructions for your operating system. - Python: Any recent version should do. You'll need Python to run the code that generates the Buildkite pipeline definition.
- The Buildkite agent: The agent is a lightweight binary that connects to Buildkite to run your builds. Since we'll be running the builds for this walkthrough on your local machine, you'll need to install the agent so you can run it later on. If you're on a Mac, you can do that by running
brew install buildkite/buildkite/buildkite-agent.
Make sure everything's set up correctly before moving on:
bazel --version
bazel 7.4.1

buildkite-agent --version
buildkite-agent version 3.95.1

python3 --version
Python 3.13.1
Getting the code
Rather than create everything from scratch, we'll use an existing repository to get your project properly bootstrapped so you can follow along easily. You'll find that repository on GitHub:
https://github.com/cnunciato/bazel-buildkite-example
You'll also be triggering pipeline builds based on GitHub commits, so you'll need to get a copy of the example repository into your GitHub account as well, and then clone your remote copy so you can push to it directly.
The easiest way to do that is to create a new repository from the example template, then clone it to your local machine in the usual way. If you happen to have the GitHub CLI installed, you can do that with a single command:
gh repo create bazel-buildkite-example \
  --template cnunciato/bazel-buildkite-example \
  --public \
  --clone
With your copy of the repository created and cloned locally, change to it to get started:
cd bazel-buildkite-example

ls
.buildkite app  library  MODULE.bazel  README.md
Let's have a look at the contents of the repository next.
Understanding the repository structure
The example we're working with is a simple Python monorepo that contains two Bazel packages:
- a Python library package named
library - a Python "binary" package (really just a Python script) named
appthat depends on the library package
Each has its own BUILD.bazel file of course, and a MODULE.bazel file defines the surrounding Bazel workspace. (We'll get to the .buildkite folder in a moment.) Here's the full tree:
bazel-buildkite-example/
├── .buildkite               # Buildkite configuration
│   ├── pipeline.yml
│   ├── pipeline.py
│   ├── step.py
│   └── utils.py
├── app                       # Python application that depends on the library
│   ├── BUILD.bazel.
│   ├── main.py
│   └── test_main.py
└── library                   # Python library
    ├── BUILD.bazel
    ├── hello.py
    └── test_hello.py
└── MODULE.bazel              # Bazel module definition
The application and the library
The library package exposes a single Python function whose whole sole responsibility is to deliver the greeting we all know so well:
# library/hello.py
def get_greeting():
    return "Hello, world!"
The app package imports and uses that library by calling get_greeting() and using the result to print a message to the terminal:
# app/main.py
from library.hello import get_greeting

def say_hello():
    response = get_greeting()
    return f"The Python library says: '{response}'"

print(say_hello())
That's about it for the application—again, it's intentionally simple. What's important is that it sets up the dependency relationship we'll be using to illustrate the example, which is explicitly defined in the app package's BUILD.bazel file:
# app/BUILD.bazel
load("@rules_python//python:defs.bzl", "py_binary", "py_test")

py_binary(
    name = "main",
    srcs = ["main.py"],
    deps = [
        "//library:hello", # 👈 This tells Bazel that `app` depends on `library`.
    ],
)
Our goal is to draw on the existence of this dependency to implement the logic that'll compute the pipeline dynamically from one commit to the next. To do that, we'll use Bazel (specifically bazel query, as you'll see in a moment) to figure out whether to add an additional step to the pipeline to build and test the app package whenever something changes in library.
Go ahead and confirm this all works by running the app package with Bazel now:
bazel run //app:main
...
INFO: Running command line: bazel-bin/app/main
The Python library says: 'Hello, world!'
You can confirm the dependency relationship as well by asking Bazel which other packages depend on any targets in //library:
bazel query "kind('py_binary', rdeps(//..., //library/...))"
//app:main
Now let's take a closer look at what's happening in the .buildkite folder.
The Buildkite pipeline definition
The core of the approach we're taking in this example is to use Bazel (in combination with Git) to assemble the Buildkite pipeline dynamically based on the Bazel dependency graph. There are three files that conspire to make that happen.
The entrypoint: pipeline.yml
This is the file that kicks off the process. When a build job starts, the Buildkite agent checks out your source code, finds this file, and evaluates it, running the commands listed in the first step and passing the results to buildkite-agent pipeline upload:
# .buildkite/pipeline.yml
steps:
  - label: ":python: Compute the pipeline with Python"
    commands:
      - python3 .buildkite/pipeline.py | buildkite-agent pipeline upload
This step runs the Python script that computes the work to be done in the pipeline run and passes the result as JSON to buildkite-agent, which uploads it to Buildkite, appending it to the already-running pipeline.
The pipeline generator: pipeline.py
This is the Python script that does the work of assembling the pipeline programmatically.
Here's how it works:
- It begins by using Git to identify the directories that changed in the most recent commit, then runs
bazel queryto identify which of those directories, if any, contain Bazel packages. - For each changed package, it adds a step to the pipeline to build and test all of the Bazel targets in the package.
- If any of those packages were Python libraries with one or more dependents, it adds a command to be run after that package's
bazel buildto generate and append a follow-up step to the pipeline to build each of the library's dependents as well. - Writes the resulting pipeline as a JSON string to
stdout.
Open pipeline.py in your favorite editor for a closer look. The inline comments there (and below) should clarify what's happening in more detail:
# .buildkite/pipeline.py
from utils import run, filter_dirs, get_paths, get_package_step, to_json

# By default, do nothing.
steps = []

# Get a list of directories changed in the most recent commit.
changed_paths = run(["git", "diff-tree", "--name-only", "HEAD~1..HEAD"])
changed_dirs = filter_dirs(changed_paths)

# Query the Bazel workspace for a list of all packages (libraries, binaries, etc.).
all_packages = run(["bazel", "query", "'/...'"])

# Using both lists, figure out which packages need to be built.
changed_packages = [p for p in changed_dirs if p in get_paths(all_packages)]

# For each changed Bazel package, assemble a pipeline step programmatically to
# build and test all of its targets. For Python libraries, add a follow-up step
# to be run later that builds and tests their reverse dependencies as well.
for pkg in changed_packages:

    # Make a step that runs `bazel build` and `bazel test` for this package.
    package_step = get_package_step(pkg)

    # Use Bazel to query the package for any Python libraries.
    libraries = run(["bazel", "query", f"kind(py_library, '//{pkg}/...')"])

    for lib in libraries:

        # Find the library's reverse dependencies.
        reverse_deps = run(["bazel", "query", f"rdeps(//..., //{pkg}/...)"])

        # Filter this list to exclude any package that's already set to be built.
        reverse_deps_to_build = [
            p for p in get_paths(reverse_deps, pkg) if p not in changed_packages
        ]

        for dep in reverse_deps_to_build:
            rdep_step = get_package_step(dep)

            # Add a command to the library's command list to generate and append
            # a build step (at runtime) for the dependent package as well.
            package_step["commands"].extend([
                f"echo 'Generating and uploading a follow-up step to build {dep}...'",
                f"python3 .buildkite/step.py {dep} | buildkite-agent pipeline upload"
            ])

    # Add this package step to the pipeline.
    steps.append(package_step)

# Emit the pipeline as JSON to be uploaded to Buildkite.
print(to_json({"steps": steps}, 4))
You should be able to run this script now to see that it works:
python3 .buildkite/pipeline.py
{
    "steps": []
}
If you're wondering why the steps array is empty, it's because on my machine, the latest commit in the repository touches neither app nor library:
git show --name-only
README.md
Which is just what we want—namely to avoid wasting time and compute resources doing work we don't have to. Here, since there isn't anything Bazel-buildable that's changed, there's no need to run bazel at all, so the resulting pipeline is empty. Later, though, when there is, the logic we've written will recognize that and do what's expected, but nothing more.
Utility functions: utils.py
This file just defines a few helper functions for pipeline.py, most of which handle common tasks like running shell commands (git, bazel), processing lists, serializing JSON, and the like, all in the interest of making pipeline.py more readable and maintainable.
Two of those functions, however, are worth calling out:
# .buildkite/utils.py
import json, os, subprocess

# Returns a Buildkite `command` step as a Python dictionary.
def command_step(emoji, label, commands=[], plugins=[]):
    step = {"label": f":{emoji}: {label}", "commands": commands}
    if plugins:
        step["plugins"] = plugins
    return step

# Returns a Buildkite `command` step that builds, tests, and annotates a Bazel package.
def get_package_step(package):
    return command_step(
        "bazel",
        f"Build and test //{package}/...",
        [
            f"bazel test //{package}/...",
            f"bazel build //{package}/... --build_event_json_file=bazel-events.json",
        ],
        [{ "bazel-annotate#v0.1.0": { "bep_file": f"bazel-events.json"} }],
    )
These two functions—given a package name, label, and emoji (always!)—produce the individual steps that ultimately make up the full pipeline definition:
command_step()returns a Buildkite step-shaped Python dictionary to be converted to JSON later withpipeline.py.get_package_step()callscommand_step()to assemble a step that runsbazel testandbazel buildfor the specified package. The build step also tells Bazel to produce a build-event file (or BEP file) containing the details of the build, which we'll use (via the official bazel-annotate plugin) to render a rich annotation of the build in the Buildkite dashboard.
You'll see how this all comes together in the next section.
Incidentally, why Python?
We chose Python for this walkthrough because it's well known and easy to read. The mechanics are the same for any language, though; as long as your language of choice can produce JSON or YAML, you can use it to generate pipelines in Buildkite. See the Dynamic Pipelines docs and the Buildkite SDK for examples in other languages.
Running it locally: Dynamic pipelines in action
Let's run through a couple of scenarios locally to get a sense of how the pipeline will react to different types of changes.
Scenario 1: Changes to the application only
First, simulate a change to the application by adding a comment to ./app/main.py, committing, and then running the pipeline generator:
echo "# Adding a comment" >> app/main.py
git add app/main.py
git commit -m "Update the app"

python3 .buildkite/pipeline.py
The output should look something like this:
{
    "steps": [
        {
            "label": ":bazel: Build and test //app/...",
            "commands": [
                "bazel test //app/...",
                "bazel build //app/... --build_event_json_file=bazel-events.json"
            ],
            "plugins": [
                {
                    "bazel-annotate#v0.1.0": {
                        "bep_file": "bazel-events.json"
                    }
                }
            ]
        }
    ]
}
Notice the pipeline reflects that only the app package will be built and tested: the script correctly detected that no other packages were changed.
Scenario 2: Changes to the shared library
Now try making a change to the library package:
echo "# Adding a comment" >> library/hello.py
git add library/hello.py
git commit -m "Update the library"

python3 .buildkite/pipeline.py
This time, the output should include steps for both the library and the app—the latter as a follow-up step once the library build finishes (the JSON for that step passed as input to buildkite-agent pipeline upload):
{
    "steps": [
        {
            "label": ":bazel: Build and test //library/...",
            "commands": [
                "bazel test //library/...",
                "bazel build //library/... --build_event_json_file=bazel-events.json",

                "echo '👇 Generating and uploading a follow-up step to build app...'",
                "python3 .buildkite/step.py app | buildkite-agent pipeline upload"
            ],
            "plugins": [
                {
                    "bazel-annotate#v0.1.0": {
                        "bep_file": "bazel-events.json"
                    }
                }
            ]
        }
    ]
}
Using Git, Bazel, and a few Bazel queries, the pipeline generator correctly detected that because the library package had changed, both app and library should be built and tested, and that app should be built as a follow-up step.
Bringing it all together
With things looking good locally, it's time to push some commits to GitHub and run some real builds.
Get the Buildkite agent started
You'll be running the Buildkite agent locally, and for that, you'll need to give it a token that tells it which cluster and build-event queue to subscribe to. Here's how to do that:
- If you don't yet have a Buildkite account, sign up for a free trial. Give your organization a name, pick the Pipelines path, choose Create pipeline > Create starter pipeline > Set up local agent, and follow the instructions to start
buildkite-agent. - If you do have a Buildkite account, navigate to Agents in the Buildkite dashboard, choose (or create) a self-hosted cluster, then choose Agent tokens > New token. Copy the generated token to your clipboard, then return to your terminal to start
buildkite-agent.
buildkite-agent start --token ${your-token}At this point, you should have a Buildkite agent running locally:
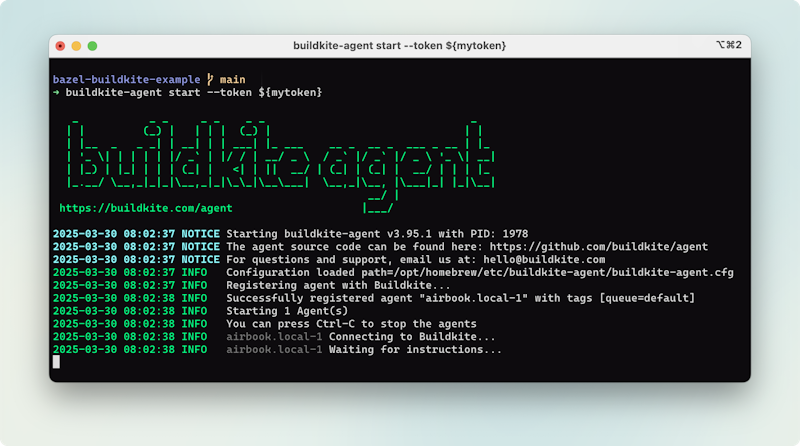
The Buildkite agent running locally
Create a new pipeline
- In the Buildkite dashboard, navigate to Pipelines, then New pipeline. Connect the pipeline to your GitHub account if you're prompted to do so, making sure to grant access to your newly created
bazel-buildkite-examplerepository. (This is important.) - On the New Pipeline page, connect your repository, choose HTTPS for the checkout type, name the pipeline
bazel-buildkite-example, and choose the Cluster you selected (or that was created for you) in the previous section. Leave the default pipeline steps as they are, then choose Create pipeline.
With the pipeline created, and the buildkite-agent connected and listening in your terminal, it's time to push some commits to see how this works end to end.
Run some builds 🚀
Assuming you've been following along step by step, your most recent local commit should still be the one you made to the library package above—which is good, because that's exactly the one we want to use to validate the logic we care about. Open another terminal tab to confirm that:
git log -1

commit 91929ffd46cb530669904b42e8da40c512f5be02 (HEAD -> main)
...
Update the library
Go ahead and push that commit to GitHub now (straight to main, for simplicity) to trigger a new build of the bazel-buildkite-example pipeline:
git push origin mainYou should see your locally running Buildkite agent respond immediately to pick up the job and begin processing it.
Now, back in the Buildkite dashboard, navigate to the pipeline and watch the build as it unfolds, one dynamically added step at a time, concluding with the app package being built and tested as a downstream dependent as expected:
A multi-step dynamic pipeline computed from Bazel package dependencies
Feel free to experiment here, making additional commits and pushing them as often as you like to see how the pipeline responds. In general, you should see that:
- Commits that change both the
appandlibrarypackages trigger pipelines that build both packages - Commits that change only the
apppackage trigger pipelines that build only that package - Commits that change only the
librarypackage build the library first, then the app—again, as a downstream dependent, conforming to the business logic we set out to implement - Commits to anything else are ignored, and the pipeline completes within a few seconds
And there you have it: a fully dynamic, easily maintainable and extensible—and testable!—pipeline that uses Bazel, Git, and Python to get the job done—no YAML required.
Capture and convert Bazel events into rich annotations
Before we wrap up, let's come back to those build options we've been passing into our bazel build commands:
bazel build //app/... --build_event_json_file=bazel-events.jsonThat --build_event_json_file option tells Bazel to collect and emit structured data about the build process, such as which targets were affected, their types, how long it took to build each one, and whether the build passed or failed. These build events are protocol-buffer messages that Bazel writes to a text file containing one line per event, each individual line a variably structured JSON object.
Here's a snippet from one of my own BEP files, for example:
{"id":{"started":{}},"children":[{"progress":{}},{"unstructuredCommandLine":{}},{"structuredCommandLine":{"commandLineLabel":"original"}},{"structuredCommandLine":{"commandLineLabel":"canonical"}},{"structuredCommandLine":{"commandLineLabel":"tool"}},{"buildMetadata":{}},{"optionsParsed":{}},{"workspaceStatus":{}},{"pattern":{"pattern":["//..."]}},{"buildFinished":{}}],"started":{"uuid":"d7ak38s7-d3b2-45ae-a79c-63eks82b2c82","startTimeMillis":"1743442193828","buildToolVersion":"7.4.1","optionsDescription":"--test_output\u003dALL --build_event_json_file\u003dbazel-events.json","command":"build","workingDirectory":"/Users/cnunciato/Projects/cnunciato/bazel-buildkite-example-fromtemplate","workspaceDirectory":"/Users/cnunciato/Projects/cnunciato/bazel-buildkite-example-fromtemplate","serverPid":"20646","startTime":"2025-03-31T17:29:53.828Z"}}
{"id":{"buildMetadata":{}},"buildMetadata":{}}
{"id":{"structuredCommandLine":{"commandLineLabel":"tool"}},"structuredCommandLine":{}}
{"id":{"pattern":{"pattern":["//..."]}},"children":[{"targetConfigured":{"label":"//app:main"}},{"targetConfigured":{"label":"//app:test_main"}},{"targetConfigured":{"label":"//library:hello"}},{"targetConfigured":{"label":"//library:hello_wheel"}},{"targetConfigured":{"label":"//library:hello_wheel_dist"}},{"targetConfigured":{"label":"//library:test_hello"}}],"expanded":{}}
{"id":{"progress":{}},"children":[{"progress":{"opaqueCount":1}},{"workspace":{}}],"progress":{"stderr":"\u001b[32mComputing main repo mapping:\u001b[0m \n\r\u001b[1A\u001b[K\u001b[32mLoading:\u001b[0m \n\r\u001b[1A\u001b[K\u001b[32mLoading:\u001b[0m 0 packages loaded\n"}}
These events can be incredibly helpful for understanding what happened during a given build—but in order to use them, you need to parse them, store them somewhere, and somehow transform them into something readable that your team can review on a regular basis.
Buildkite annotations are a great way to make use of this data. Annotations are essentially Markdown snippets that you can attach to a pipeline build with buildkite-agent annotate:
buildkite-agent annotate ":bazel: Hello from Bazel 👋"You can build out your own JSON parsing and annotation logic if you like—see the Bazel team's own Buildkite pipeline for an example. Or you can do what we've done here, and just use the official Bazel BEP Annotate plugin, which understands the BEP file format and handles everything for you:
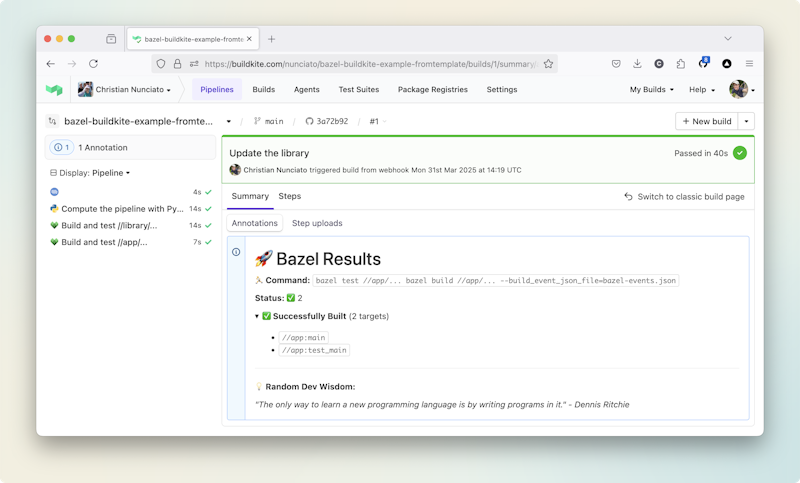
A Buildkite annotation showing the results of a Bazel build, sourced from a Bazel event protocol (BEP) file.
See the annotation API docs for more details.
Next steps
We covered a lot in this post—and hopefully you've now got a good sense of what's possible when you move away from writing your pipelines in static languages like YAML and toward driving them dynamically with tools like Bazel and Buildkite.
To keep the learning going:
- Check out how the Bazel team built its own delivery process on top of Buildkite
- See how the Uber team used Go and Buildkite to scale beyond Jenkins
- Continue experimenting the example repository
- Dive into the dynamic pipelines docs or explore the Buildkite SDK
